

We all start learning Latex at the first level:
These tasks are often easy to do and well documented.
When it comes to making a custom template, the documentation is more limited.
In this post, I will explain a little bit how to “read/understand” how is organized a template. I will not present everything, only things that are necessary to survive and which were useful in my case. I won’t cover for instance how to change the design, color, position of the slidebar, or how to modify the background image. Nevertheless, with the knowledge presented here, you will be able to better navigate to obtain the behavior you want.
Here, we assume you (at least) know how to use LaTeX, i.e. loading a template, changing page format, inserting math equation, bold effect, and compiling the document.
Before this post, my state was the following:
.sty or .cls, what’s the difference ?We won’t detail how to create a package from scratch. There are already some articles about that on Overleaf for instance.
Based on my recent exploration, I will try to answer partially to these questions.
Where you can find info about what is installed on your Linux (if no custom install):
/usr/share/texlive: package installed/usr/share/texlive/texmf-dist/tex: tex language supported (luatex, xelatex, latex, xetex in my case)In both .sty and .cls, you can write tex code.
When searching on Github, sometimes people make their custom templates by writing a .sty, sometimes by writing a .cls.
This is not forbidden, they work barely the same.
However, for code hygiene, for sharing, it is better to use them appropriately.
.cls are class files.
They are used to defined global behavior of the document. For instance, setting margin width, page size, automated bibliography at the end of the doc, in other words, things we don’t really want to customize. Classes are here to provide the minimal viable document without any customization.
In the default classes, you have:
article, report, lettrebook, memoirslides, beamerIn a .tex file, only one class is imported at a time, with \documentclass{article} (without the .cls if in the current folder).
Within this file, we can import .sty files to define some behaviors with \RequirePackage{<my_package_without.sty>}.
FR: How to create your package
A .sty file is a package file.
A package file can include other package files to write more complex functions.
Packages are often a set of functions which help you to perform a particular task:
In a .tex file, we can import multiple different packages with \usepackage{...}.
They can be generated from .dtx files.
If you are always importing the same packages for writing your tex documents,
you can create a package custom.sty where your list all the libraries you would need.
Therefore, in a single import you would have all your libraires loaded.
.sty |
.cls |
|
|---|---|---|
| Load | \usepackage{...} |
` \documentclass{…}` |
| What? | style / package | classes |
| Number | Many ! | A few |
| Github Ex | beamerbaseboxes | Beamer.cls |
| Complexity | Hard | Simple |
| Number of import | several | one |
The difference between the two types of files can be blurred:
Latex is to Lisp what brackets and backslash are to parenthesis.
I will try to cover:
\newcommand\renewcommand\def@If I have one command without arguments:
\newcommand{\myfunctionName}{<action to be done>}
For instance for \newcommand{\R}{\mathbb{R}}
\RIf I have \(k\) arguments, I add [k] (must be a positive integer), such as:
\newcommand{\myfunctionName}[k]{<action done>}
For instance, if I want to make any letter with double bar:
\newcommand{\bb}[1]{\mathbb{#1}}, where \bb{R} would have the same effect as \R
You call the 1st argument with #1, the second with #2, etc.
Note: I cannot name arguments. Its #1#2#3#4.
We can add one optional argument.
The first argument (#1) would be optional if you specify a default value.
\newcommand{\functionName}[numberOfArg][DefaultValue]{functionDescripiton}
For instance, with this function with 3 arguments, and the first set to 2:
\newcommand{\plusbinomial}[3][2]{(#2 + #3)^#1}
You can call it with or without using the default value:
\plusbinomial{a, b} exploits the default value, and returns \((a + b)^2\) while\plusbinomial[3]{a, b} replaces the default value by 3, and returns \((a + c)^3\).For more than one arguments, you need to look at packages:
You may not know that a function with the same name already exists, or it is defined in the theme and you want to overwrite it.
For that case, \newcommand would throw an error.
To overwrite the function, you need to use \renewcommand, with the same syntax.
\def: (TeX primitive) these are the sensible definition. Can be overwritten.\newcommand: (LaTeX primitive), with the same behavior as \def
\newcommand\foo{}: \long\def\foo{}\newcommand*\foo{}: \def\foo{} (not long).with \long, it reads all the code within the bracket. Without, it reads the first definition line…
It seems that the * allows when closing bracket are missing to pass through.
\def VS \define 7\define is used to defined macros, which follows the format:
\define@key{<family>}{<key>}{<function>}
In packages, we can find function with @ in, for instance \mymodule@mysubmodule@myfunction{}.
These are private functions, that can only be used within the current module, therefore cannot be used outside.
Even if they are private, they can be redefined with the command \patchcmd
which uses the syntax \patchcmd{<command>}{<code to replace>}{<code>}{<success>}{<failure>} to correct the command (Source).
\newenvironment{myenv}: allows to defines stuff in a limited scope.
The syntax is similar to a function:
\newenvironment{<name_for_my_env>}[<number_of_arguments>][<Default_argument>]{<opening definition>}{<closing definition>}
To call an environment, you know the syntax, it is like \begin{enumerate}:
\begin{myenv}[myoptionalarg]{My necessary arg}

Whatever you need to write

\end{myenv}
Environment allows to define things that happens before text is inputted ({opening definition}), and what happens after.
This is helpful for changing fontsize, color, adding some extra space, centering, …
This is one way to define a local style.
Our target objective is to customize a template to make beautiful beamer slides. If you don’t know about beamer, the user guide is a good place to start. You can find it here 8. 9.
The most important picture in the Beamer documentation is the following, helping to know which item is above the other.
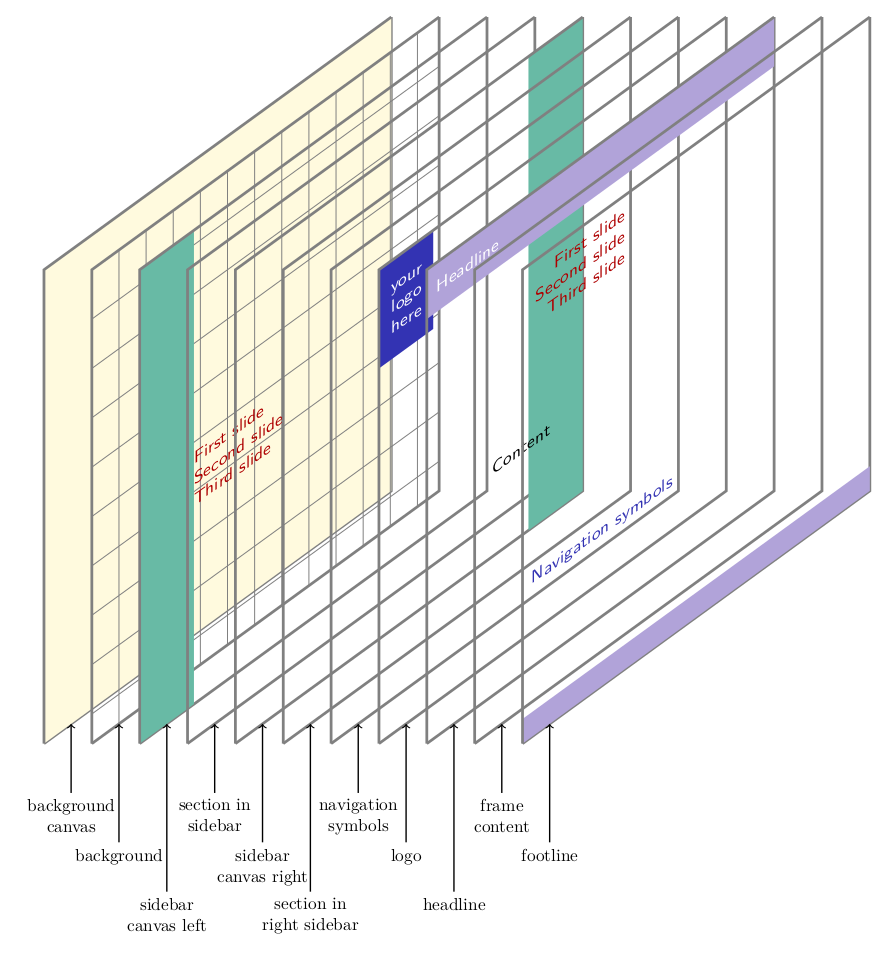
In beamer packages files, you will find \defbeamertemplate and \setbeamertemplate.
\defbeamertemplate is about defining a behavior with the syntax \defbeamertemplate{<obj>}{<stylename>}{<my obj with style behavior definition>}\setbeamertemplate is about enforcing it with two cases:
\setbeamertemplate{<obj>}[<predefined style>] (use the template)\setbeamertemplate{<obj>}{Custom behavior} (live definition)Note: Optional arguments can be used, with (p.169 8):
\defbeamertemplate{<obj>}{<stylename>}[<k_args>]{<my obj with arg #1, #2>}
\setbeamertemplate{<obj>}[<stylenam>]{arg1}{arg...}{argk}
The list of objects that are modifiable in beamer is available here 10. These object are defined in the “core of beamer engine”.
You can have multiple styles for the same object. For instance:
\defbeamertemplate{section page}{simple} defines the behavior simple for the object section page.\defbeamertemplate{section page}{progressbar blue} defines the behavior progressbar blue for the same object.To select the one we want to use, we need to “set” the template, for instance with \setbeamertemplate{section page}[progressbar blue].
A local behavior can be enforced, by using the bracket:
{\setbeamertemplate{xx}{xx}
  text, items, frames, where I want this template to be applied
}
There are many built-in themes for beamer.
Themes are packages (.sty files) which defines and enforce the style of the document.
You can find them on the Beamer Github Repository).
It is helpful if you have no time for configuration.
Beamer is first a class of documents, which is defined here.
It loads some necessary external packages, plus the package beamerbaserequires.sty stored in the same directory with:
\RequirePackage{beamerbaserequires}
The beamerbaserequires.sty is just a file that loads all components:
...

% Commands for constructing the title page
\RequirePackage{beamerbasetitle}

% Parts, sections, subsections, appendix
\RequirePackage{beamerbasesection}

% Commands for constructing frames
\RequirePackage{beamerbaseframe}
\RequirePackage{beamerbaseverbatim}
\RequirePackage{beamerbaseframesize}

% Headlines, sidebars, columns
\RequirePackage{beamerbaseframecomponents}

...
The syntax in the beamer components is very difficult to understand from a beginner perspective. We can understand that in each is define the default behavior in different cases.
For instance, for the Table of Content component, we have the line:
\define@key{beamertoc}{currentsection}[]{\beamer@toc@sectionstyle{show/shaded}\beamer@toc@subsectionstyle{show/show/shaded}\beamer@toc@subsubsectionstyle{show/show/shaded}}
which is a macro where:
family is beamertockey is currentsection[]and the function call three functions:
\beamer@toc@sectionstyle with argument show/shaded (this is one argument)\beamer@toc@subsectionstyle with argument show/show/shaded\beamer@toc@subsubsectionstyle with argument show/show/shadedThey both works the same way, so we will look at the first one, which is defined somewhere eles as:
\def\beamer@toc@sectionstyle#1{\beamer@toc@process\beamer@toc@cs\beamer@toc@os#1//}
It takes one argument (#1 after the name definition), and call three functions:
\beamer@toc@process, defined by \def\beamer@toc@process#1#2#3/#4/{\ifblank{#4}{\def#1{#3}\def#2{#3}}{\def#1{#3}\def#2{#4}\@gobble}} (Note the /#4/ for argument definition.)\beamer@toc@cs defined as \def\beamer@toc@cs{show}, i.e. a function with no argument that returns show\beamer@toc@os defined as \def\beamer@toc@os{show} (same than the previous one)Explained in natural language, \beamer@toc@process:
#1 is taken as a function name calling #3 (\def#1{#3}), and #2 also call #3#1 still call #3, but now #2 returns #4.The \@globble consumes the additional parameter 11.
For #1=show/shaded in \beamer@toc@sectionstyle#1, the command calls \beamer@toc@process{show}{show}{show/shaded}//.
Maybe with the latex magic, it will find the / and identify #3=show and #4=shaded
When interpreting the \def#1{#3}\def#2{#4}, I don’t quite understand if it really defines twice the function show, one outputing show while the other shaded…
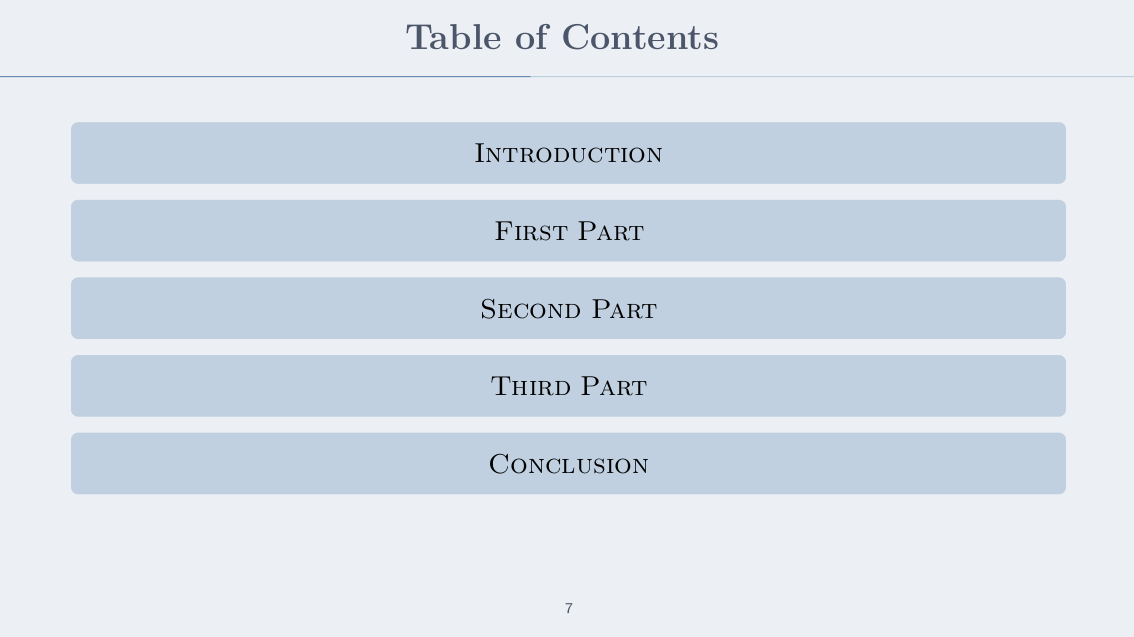
\tableofcontentsTODO: Put it later or organize.
To call the table of content, we can use the command \tableofcontents.
We can add the option \tableofcontents[currentsection] to highlight the current section, and shade the other.
In the tableofcontents methods, the argument currentsection would be send to \setkeys{beamertoc}{#1}.
\setkeys will use the definition of the corresponding \define@key.
\def\beamer@tableofcontents[#1]{
  \def\beamer@toc@cs{show}
  \def\beamer@toc@os{show}
  \def\beamer@toc@css{show}
  \def\beamer@toc@oss{show}
  \def\beamer@toc@ooss{show}
  \def\beamer@toc@csss{show}
  \def\beamer@toc@osss{show}
  \def\beamer@toc@oosss{show}
  \def\beamer@toc@ooosss{show}
  \beamer@showpartnumber=\c@part
  \beamer@pausesectionsfalse
  \beamer@pausesubsectionsfalse
  \def\beamer@tocsections{<*>}
  \setkeys{beamertoc}{firstsection=1}
  \setkeys{beamertoc}{#1}
  \vspace*{-.5em}{\makeatletter
    \pause[0]
    \@input{\jobname.toc}
    \vfill}
}
If you look at theme galleries (Here, also here, then there, again, CTAN repository, or on a github list), you will quickly see that the main differentiating characteristic is color, and the front page organisation. For the rest, everything is often left unchanged. It is often easy to guess that the slide deck has been made with LaTex.
There are two templates that I found out of the group (they don’t belong to Beamer default templates):
To facilitate template edition, it is suggested by the beamer repository to separate style modification in distinct files:
beamercolorthemeXXX.sty: color for theme XXX (imported by beamerthemeXXX)beamerfontthemeXXX.sty: fontsbeamerinnerthemeXXX.sty: define section / subsection / list / toc behaviorsbeamerouterthemeXXX.sty: page numbering, slidebar, menu, …beamerthemeXXX.sty: Package that load everything. You need to import this file to apply all the behaviors defined in the other files.The name XXX is not necessarily the same for all these files.
It is possible to combine a color theme X with a font theme Y.
To avoid loadding these barbaric names, there are predefined loading command defined in beamerbasethemes.sty. For instance, looking at the code of beamerthemedarmstadt.sty, it calls the inner, outer, and two color themes, but no font (keep the default of beamer):
\useoutertheme{smoothbars}
\useinnertheme[shadow=true]{rounded}
\usecolortheme{orchid}
\usecolortheme{whale}
If you look at orchid
and whale,
the palettes do not overlap, so both style are fully imported.
If we want to load a complete style, we need to use \usetheme{} which will look at the corresponding beamerthemeXXX.sty (in the local directory first, and in the default repository where package are installed next).
\documentclass{beamer}
\usetheme{metropolis}

\title{Test for slides}

\begin{document}
  My blabla
\end{document}
Writting a template from scratch is not easy. Our goal is only to change some properties of a template to fits our needs. If prevents from defining too many things and reinventing the wheel.
I attended a talk from a Google Researcher, with very clean slides. I wanted to recreate a similar template.
The goal is not to recreate exactly the same template, but to have something similar, like the table of content, and the circle/squares with text.
For this, we will start take:
metropolis template for the global behavior. Compared to usual beamer templates, it is lighter (no navigation bars, menu, numbers everywhere that would distract the audience)sthlm NORD for its colors.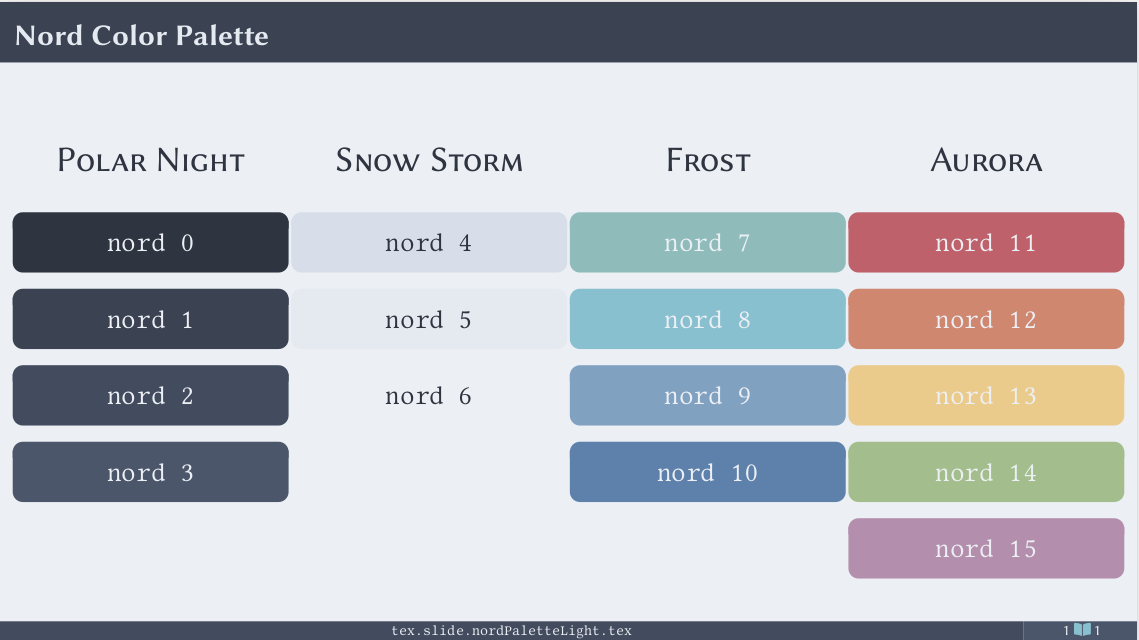
This is the easiest thing to do.
We just need to define the colors in the beamercolorthemeXXX.sty (here we added them it into beamercolorthememetropolis.sty)
...
\definecolor{nordOne}{HTML}{3B4252}
\definecolor{nordTwo}{HTML}{434C5e}
\definecolor{nordThree}{HTML}{4C566A}
\definecolor{nordFour}{HTML}{D8DEE9}
\definecolor{nordFive}{HTML}{E5E9F0}
\definecolor{nordSix}{HTML}{ECEFF4}
\definecolor{nordSeven}{HTML}{8FBCBB}
\definecolor{nordEight}{HTML}{88C0D0}
\definecolor{nordNine}{HTML}{81A1C1}
\definecolor{nordTen}{HTML}{5E81AC}
\definecolor{nordEleven}{HTML}{BF616A}
\definecolor{nordTwelve}{HTML}{D08770}
\definecolor{nordThirteen}{HTML}{EBCB8B}
\definecolor{nordFourteen}{HTML}{A3BE8C}
\definecolor{nordFifteen}{HTML}{B48EAD}

...
Next, we used these colors to customize the existing elements:
If we take this piece of code:
\setbeamercolor{frametitle}{
  use=normal text,
  parent=normal text,
  fg=nordThree,
  bg=normal text.bg
}
frametitle is the title on the top of the slideuse=<a previous object> argument to load a previously defined object to get its attribute. Multiple objects can be loaded with use={obj1,obj2}parent=<a previous object color>: inheritance, i.e. use all the color of the previous object. Here useless because color redefined. You need to set use to access the object. It sets fg and bg to its values.bg: background color. Overwrite parent inheritance if set.fg: foreground color. Overwrite parent inheritance if set. Here, it access the property of a previous object with <my object>.fgHere, normal text is a previously defined object, where we take the background color:
\setbeamercolor{normal text}{
    fg=nordThree,
    bg=nordSix
}
normal text is one of the first defined object.
In metropolis theme, most of the other objects inherit from its style.
In some way, it allows to define the background color.
Example with multiple objects and transparency usagee:
\setbeamercolor{block body}{
    use={block title, normal text},
    bg=block title.bg!50!normal text.bg % Combine block title background (50% transparency) with normal text background
  }
Example with direct inheritance:
\setbeamercolor{block body alerted}{use=block body, parent=block body}
For the full list of customizable objects, see 10.
\setbeamercolor{progress bar}{
  fg=nordTen,
  bg=nordTen!50!nordEight!50
}
fg: represent the achieved part of the presentation (left)bg: the non-achieved part (right)
In innertheme:
\setbeamertemplate{block alerted begin}{\metropolis@block{ alerted}} define the behavior\setbeamertemplate{block alerted end}{\end{beamercolorbox}\vspace*{0.2ex}} Define the bottom behavior (here add some space)Called with:
\begin{alertblock}{Conclusion}
This is an alert.
\end{alertblock}
In color, we can modify it:
Around the title:
\setbeamercolor{block title alerted}{
    bg=nordTwelve,
    fg=nordSix,
}
Content of the box:
\setbeamercolor{alerted text}{
  fg=nordZero
}
Note: For some elements, it is useless to define the background (or the foreground) because the color is ignored in the object definition itself. You need to look at the documentation code, or do a test/try/fail/success loop until the desired result is obtained.
The goal is not to have a perfect copycat, but to have a nice template reusing some of the elements seen in a previous presentation.
There are several parts we want to reproduce:
The original model is the following:
We can identify different noticeable aspect:
There are multiple items that are dedicated to the toc 10:
section in tocsection in toc shadedsection number projectedsubsection in tocsubsection in toc shadedsubsubsection in tocsubsubsection in toc shadedIn our case, we won’t have subsection or subsubsection, only section (simple presentation for less than 45 minutes).
Therefore, we only need to modify the two first elements.
section in toc define the behavior around each section printed (when not shaded),
while section in toc shaded the behavior when shaded.
In our case, the “not shaded” behavior is with a rounded box, while the shaded one with no visible box.
We need to define these behaviors in the beamerinnertheme.sty.
We defines them with the special name special, to not rewrite any existing function and to be able to recognize it in our template.
For the current section to highlight, we set our custom colors:
\defbeamertemplate{section in toc}{special}
{
    \begin{tcolorbox}[halign=center, colback=nordNine!50, colframe=nordFour, boxrule=0pt]
        \textsc{\inserttocsection}
    \end{tcolorbox}
}
We used transparency for the background color to obtain something lighter than the original color.
For the other sections, we want no highlight.
This is exactly the same box, but with its color set to the background color.
We could do it without using the tcolorbox, however, we want to keep spacing homogeneous.
To reuse the color of the normal background color, we use \usebeamercolor{normal text} and set the box background color to bg (reserved keyword):
\defbeamertemplate{section in toc shaded}{special}
{
    \usebeamercolor{normal text}
    \begin{tcolorbox}[halign=center, colback=bg, boxrule=0pt, colframe=nordFour]
        \textsc{\inserttocsection}
    \end{tcolorbox}
}
We needed also to change the page number behavior:
\defbeamertemplate{footline}{centered page number}
{\%
  \hspace*{\fill}% Space from left border
  \usebeamercolor[fg]{page number in head/foot}%Set color
  \usebeamerfont{page number in head/foot}% Set size
  \insertpagenumber%
  \hspace*{\fill} % Space from right border
  \vskip2pt% Space from the bottom
}
We have defined the style, but we did not applied it yet.
For that, we need to call them in bearmertheme.sty:
In Theme, we needed to call all the definitions.
Because spacing between toc entries was too large, we needed to redefine it.
Therefore, the code in beamertheme.sty is:
\setbeamertemplate{section in toc}[special]
\setbeamertemplate{section in toc shaded}[special]
\setbeamertemplate{footline}[centered page number]
Next, the spacing between the items was to small. We redefined the toc command to add larger spaces with:
\patchcmd{\beamer@sectionintoc}
  {\vfill}
  {\vskip\itemsep}
  {}
  {}
When calling \tableofcontents[currentsection]:
\usetheme[progressbar=frametitle]{metropolis}):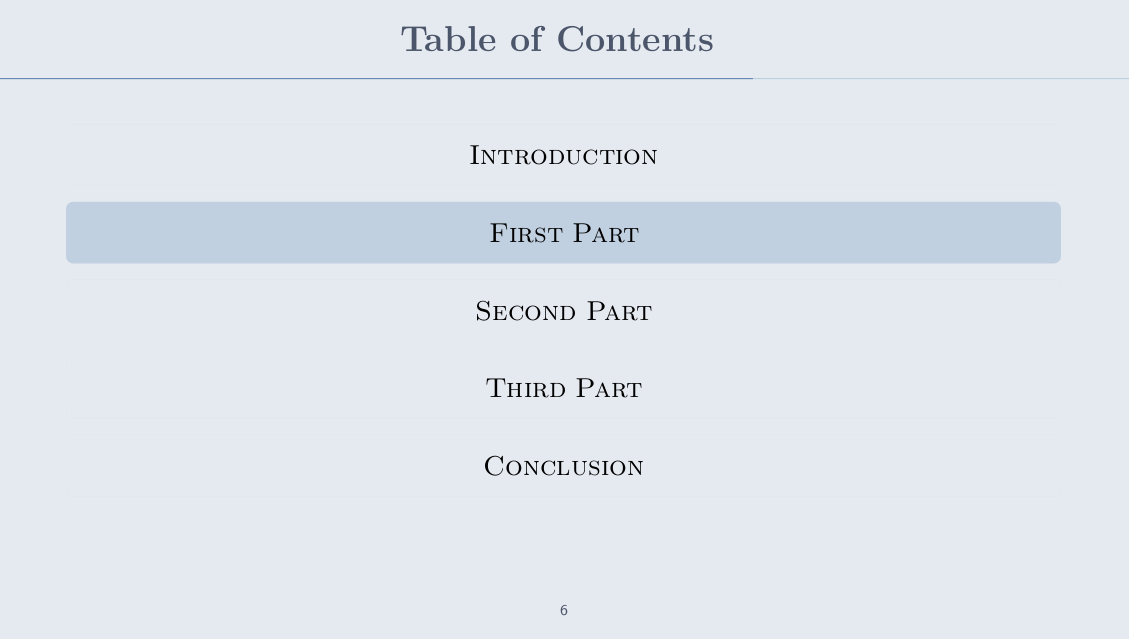
\usetheme{metropolis}):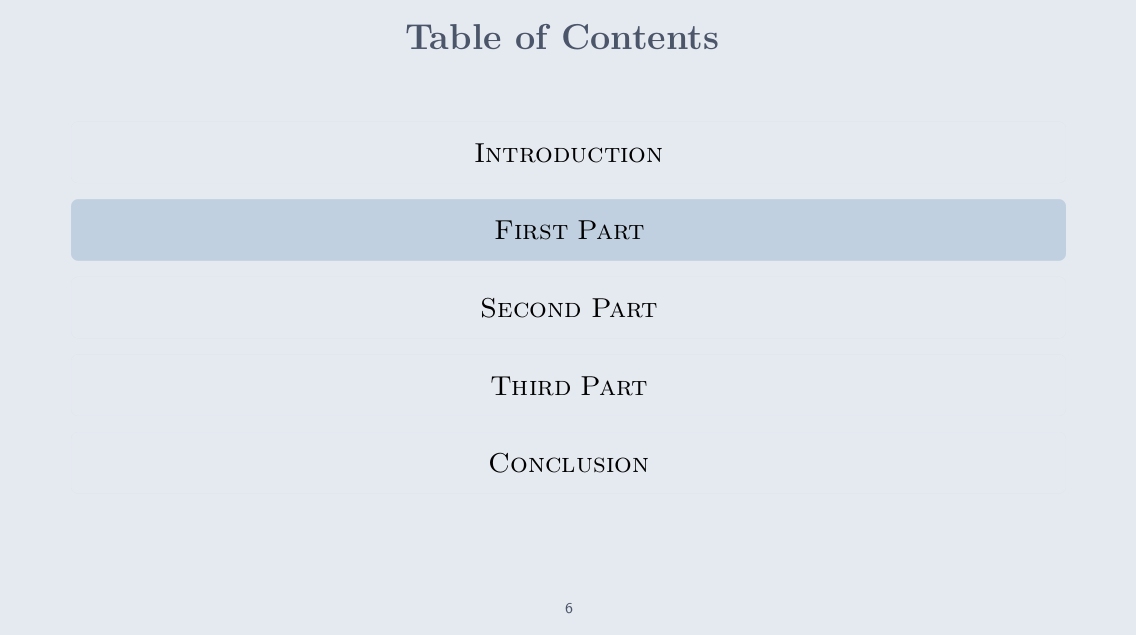
When calling \tableofcontents:
The original model is the following:
To build this headline, we defined a command to set it. This is easier because we don’t want the theme to apply everywhere.
\newcommand{\grayheadline}[2][nordFour]{
    \begin{tcolorbox}[spread sidewards, halign=center, valign=center, sharp corners, colframe=#1, colback=#1, colupper=nordZero, fontupper=\large\sffamily, height=1.5cm ]
        \textbf{#2}
    \end{tcolorbox}
}
We set the text in bold as a default.
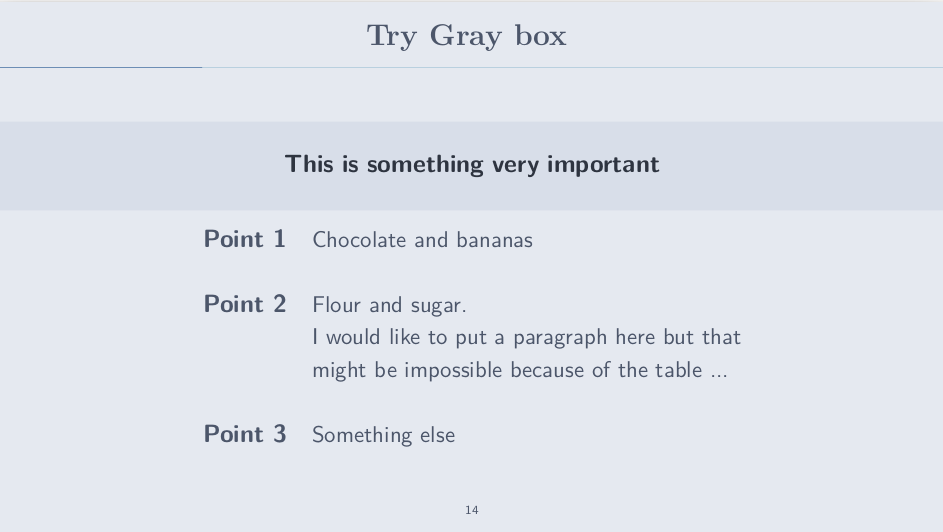
With the light-gray background color, the box limit are very hard to identify.
With white background:
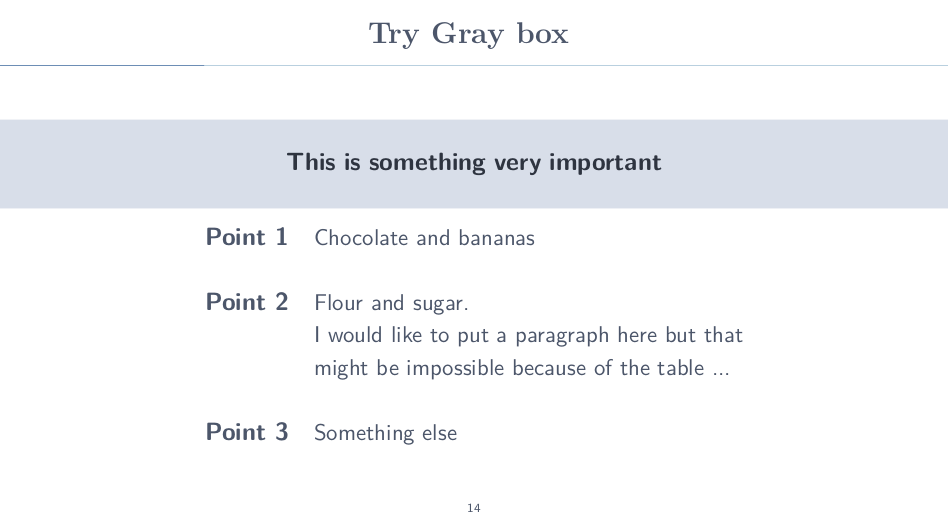
If we want to put the box up (when there isn’t much text), we can finish a frame with the \vspace{3cm} command.

<!-- latex + pandoc -->
# Try Gray box
\grayheadline{This is something very important}
\begin{center}
\begin{tabular}{ r l }
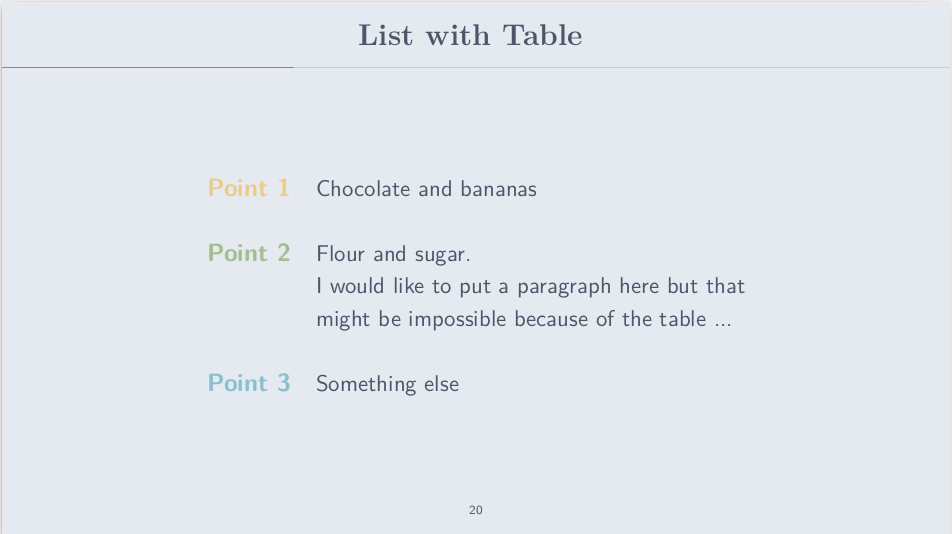
\large{\textbf{\cGrey{Point 1}}} & Chocolate and bananas \\
\\
\large{\textbf{\cGrey{Point 2}}} & Flour and sugar. \\
& I would like to put a paragraph here but that \\
& might be impossible because of the table ... \\
\\
\large{\textbf{\cGrey{Point 3}}} & Something else \\
\end{tabular}
\end{center}
\vspace{3cm}
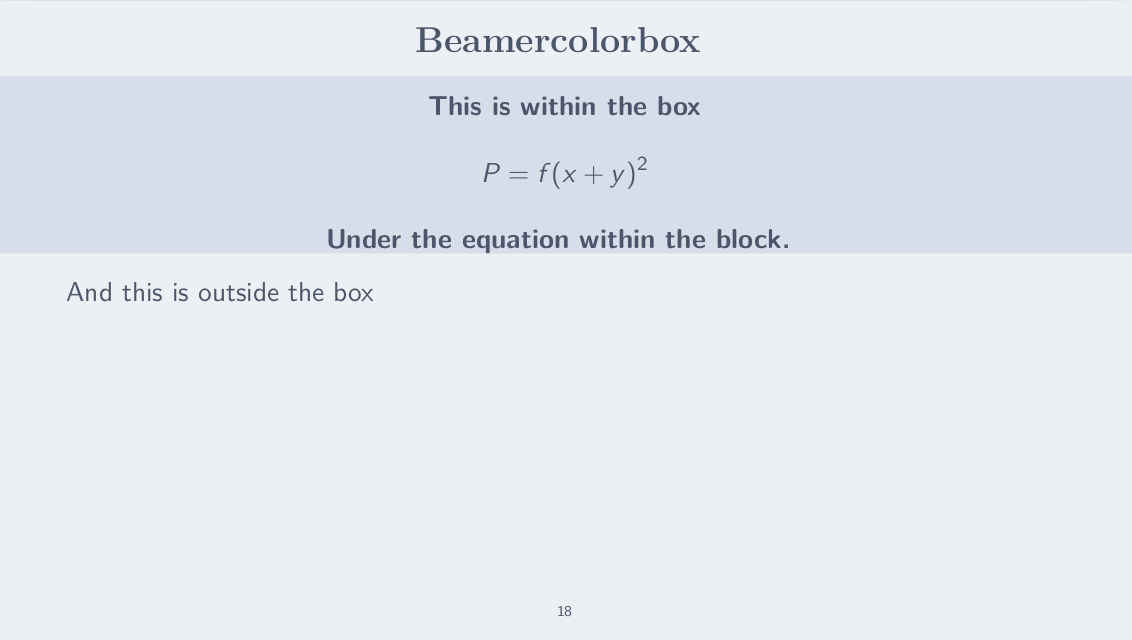
\newenvironmentThe problem with tikz is when we want to write complex stuff (table, code, …).
For simple text, it is okay but we need to inset line breaks when needed with \\.
\newenvironment can help for inserting complex text:
\newenvironment{grayheader}[1][nordFour]{
  \setbeamercolor{mytestcolor}{fg=nordThree,bg=#1}
  \begin{beamercolorbox}[wd=\paperwidth, center]{mytestcolor}
  \bfseries
}{
  \end{beamercolorbox}
}
In the code, you just have to write normally:
<!-- pandoc+latex-->
# Beamercolorbox

\begin{grayheader}

This is within the box
$$P = f(x + y)^2$$
Under the equation within the block.
\end{grayheader}


And this is outside the box

\vspace{10cm}
Initial model:
We have already done the exercise in the previous example. We only need to color left text.
\begin{center}
    \begin{tabular}{ r l }
        \large{\textbf{\cYellow{Point 1}}} & Chocolate and bananas \\
        \\
        \large{\textbf{\cGreen{Point 2}}} & Flour and sugar. \\
        & I would like to put a paragraph here but that \\
        & might be impossible because of the table ... \\
        \\
        \large{\textbf{\cLightBlue{Point 3}}} & Something else \\
    \end{tabular}
\end{center}
From the original presentation:
![]()
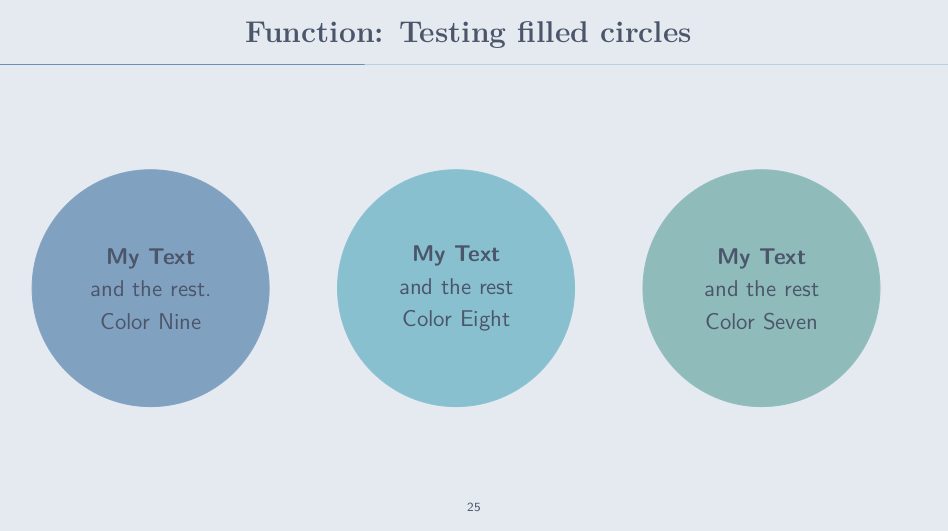
With tikz, it is possible to draw balls and rectangles.
\newcommand{\filledcircle}[2][nordThree]{
    \begin{tikzpicture}
      \node[circle,text=nordZero,fill=#2,draw=#2, align=center, minimum size=4cm] (c) at (0,0){#2};
    \end{tikzpicture}
}
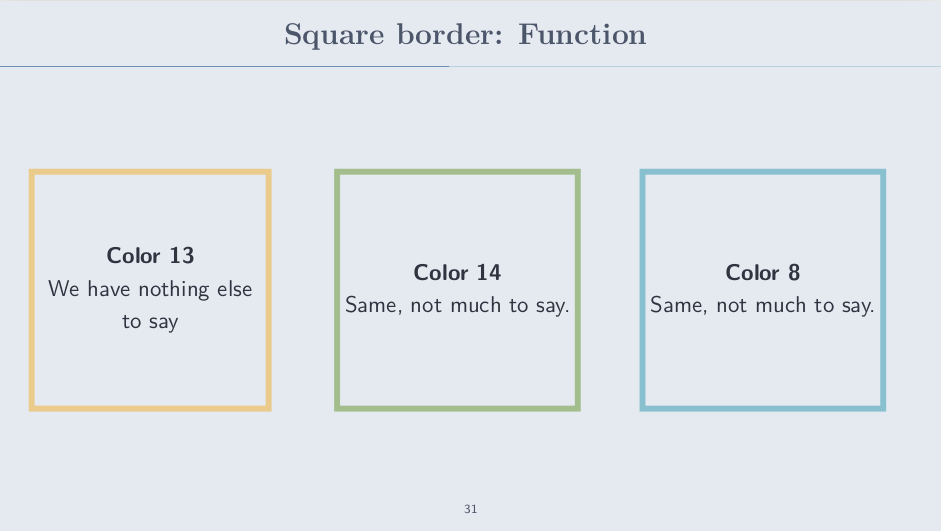
For squares, we just need to replace circle by rectangle.
For the squares with a border, we have to set line width=1mm, and to not set the background color.
\newcommand{\emptysquare}[2][nordThirteen]{
  \begin{tikzpicture}
    \node[rectangle,text=nordZero,draw=#1, align=center, minimum size=4cm, line width=1mm] (c) at (0,0){#2};
  \end{tikzpicture}
}
Next, we have to play with the colors to get all the different examples.
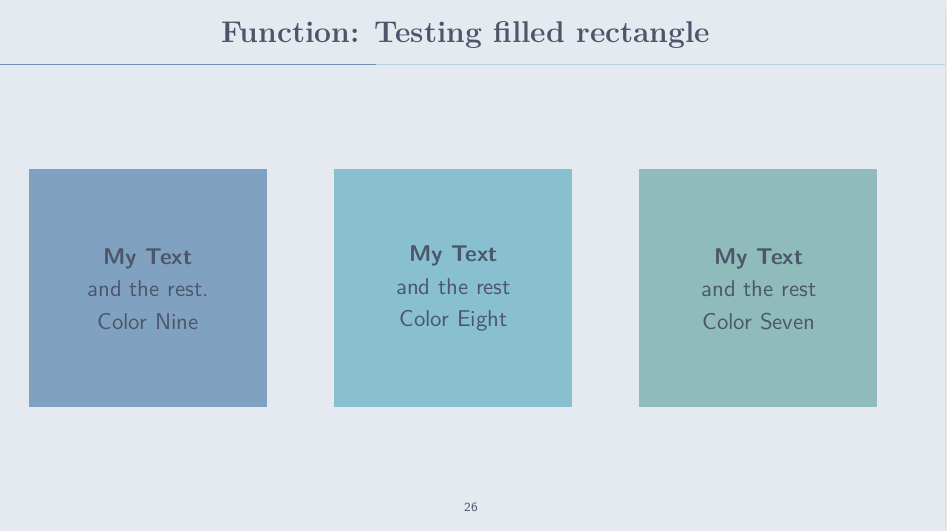
To display the first one with pandoc:
<!-- Pandoc + Latex-->
:::::::::::::: {.columns}
::: {.column width="33%"}
\filledcircle{nordNine}{\textbf{My Text}\\and the rest.\\Color Nine}
:::
::: {.column width="33%"}
\filledcircle{nordEight}{\textbf{My Text}\\and the rest\\Color Eight}
:::
::: {.column width="33%"}
\filledcircle{nordSeven}{\textbf{My Text}\\and the rest\\Color Seven}
:::
::::::::::::::
When writing text in these boxes, we need to break lines manually with \\.
Otherwise, the box would expend, or it will throw an error if you add a newline with \n.
Giving the result:
Changing circle to rectangle:
Two big square (6cm instead of 4cm):

With dark colors:
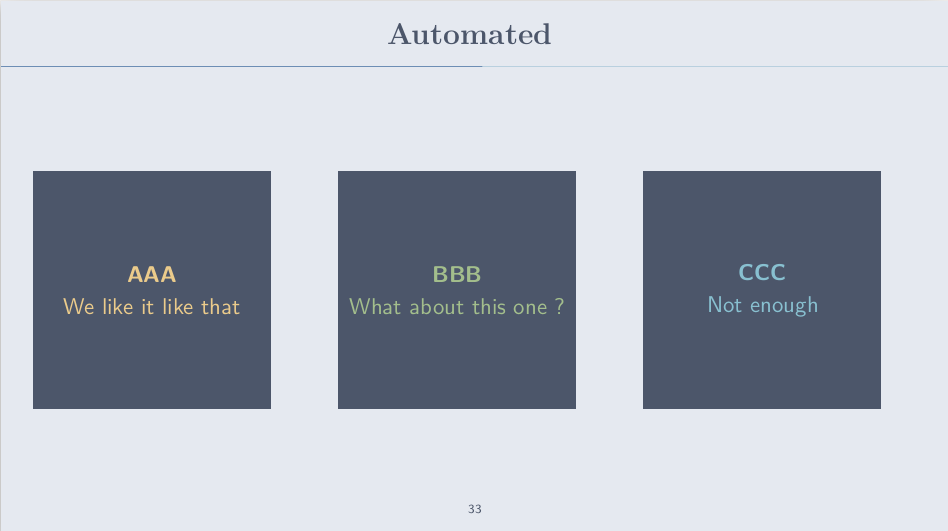
With borders:
This is about making blocks with dark color, rounded or not. Second is in three distinct columns.
For this, we used the package listing. It only puts in bold the keywords, and doesn’t play on the colors. For the coloring, it is very soft.
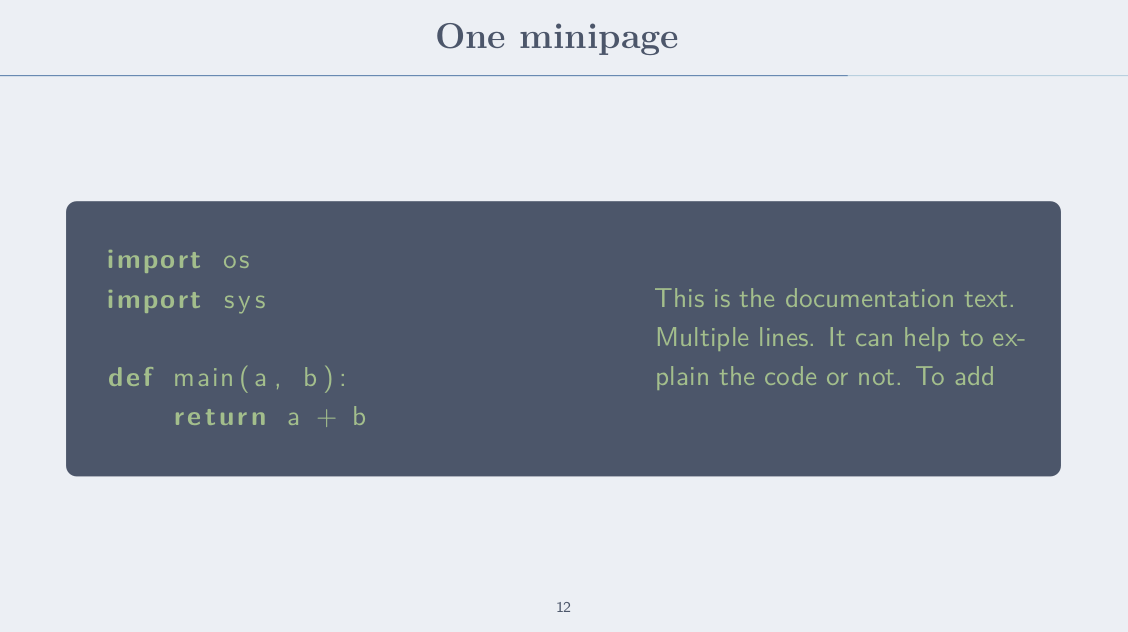
\begin{tcolorbox}[colback=nordThree,colframe=nordThree,colupper=nordFourteen]
    \begin{minipage}{.2\textwidth}
        \lstinputlisting[language=python]{pytest.py}
    \end{minipage}
    \hfill
    \begin{minipage}{.4\textwidth}
      This is the documentation text.

      Multiple lines.
      It can help to explain the code or not.
      To add.

    \end{minipage}
\end{tcolorbox}
There is the main tcolorbox defining background and text color.
minipage are here to create the illusion of two columns. The width need to be adjusted.
With pandoc, I got errors with listing and minted packages.
The only way to make them works was to input code from a file, and to set --pdf-engine-opt=--shell-escape for pandoc.
\inputminted[fontsize=\footnotesize, linenos]{python}{relief.py}
\lstinputlisting[language=python, basicstyle=\footnotesize]{relief.py}
minted gives the traditional editor coloring, while listing would only put in bold the keywords.
listing would better adapt to the slide colors, but is less expressive / more difficult to read.
It is good to have both under the hand.
I dived into template edition and command creation.
There are things that are still unknown to me (understanding tex perfectly or pgfkeys for instance).
However, I learned how to edit elements, to use the main template functions, which is enought to customize an existing template.
There are some objects that don’t need to be added to the template (box and square). We often need to customize many thing (multiple colors, changing the shape and the size). For this case, a command was easier to manipulate.
>> You can subscribe to my mailing list here for a monthly update. <<